Introduction
SharePoint is a rich and powerful platform for both users and developers. We can customize and enrich SharePoint in many ways. One of the common ways is creating custom Web Parts. With a custom Web Part, we can implement our features quick and clean. One of the useful features of MOSS Web Parts is the ability to send and receive parameters. We can easily filter a data view Web Part according to the results of another Web Part. It's good to know that we can connect our custom Web Parts as well.
Requirements
The Web Part created in this article will use Windows SharePoint Services 3.0. It will also work with MOSS 2007. To create the Web Part, we will be using Visual Studio 2005 installed on Windows Server 2003 with Extension for Windows SharePoint Services version 1.1 (you can also use Visual Studio 2008 with the Extension of WSS version 1.2). WSS or MOSS is also installed. You can use Microsoft Virtual PC for setting up such an environment in your development machine.
Creating ProviderWebPart in Visual Studio
1. Create a Web Part project in Visual Studio and name it ProviderWebPart.

2. Delete the WebPart1 folder in Solution Explorer.
3. Right click on the project and choose Add New Item and then choose Web Part. Change the name of the Web Part to ProviderWebPart.
4. Use the following code inside the Web Part class:
public class ProviderWebPart : System.Web.UI.WebControls.WebParts.WebPart{ TextBox txt; Button btn; public ProviderWebPart() { this.Title = "Provider WebPart"; this.ExportMode = WebPartExportMode.All; } protected override void CreateChildControls() { base.CreateChildControls(); Table tbl; TableRow row; TableCell cell; // A table for layout tbl = new Table(); row = new TableRow(); cell = new TableCell(); // first row for title cell.ColumnSpan = 2; cell.VerticalAlign = VerticalAlign.Middle; cell.HorizontalAlign = HorizontalAlign.Center; Label lblTitle = new Label(); lblTitle.Text = "This WebPart will send a parameter to a consumer:"; cell.Controls.Add(lblTitle); row.Controls.Add(cell); tbl.Controls.Add(row); // second row of table for textbox and button row = new TableRow(); cell = new TableCell(); cell.VerticalAlign = VerticalAlign.Middle; cell.HorizontalAlign = HorizontalAlign.Center; txt = new TextBox(); txt.Text = ""; txt.Width = Unit.Pixel(120); ; cell.Controls.Add(txt); row.Controls.Add(cell); cell = new TableCell(); cell.VerticalAlign = VerticalAlign.Middle; cell.HorizontalAlign = HorizontalAlign.Center; btn = new Button(); btn.Text = "Send..."; btn.Click += new EventHandler(btn_Click); cell.Controls.Add(btn); row.Controls.Add(cell); tbl.Controls.Add(row); //add table to webpart this.Controls.Add(tbl); } void btn_Click(object sender, EventArgs e) { // will be added later }}Note: The above code will render the interface of the ProviderWebPart.
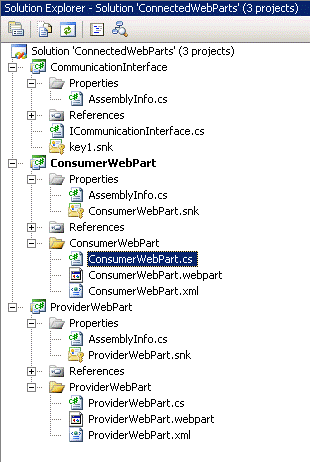
5. Now, we declare an interface for communication between two Web Parts. We must create a class library project with a strong name. To do so, go to the File menu and choose Add New Project and then select Class Library. Name it CommunicationInterface.
6. Rename class1.cs to ICommunicationInterface.cs and replace the following code in that file:
namespace CommunicationInterface{ public interface ICommunicationInterface { string Parameter1 { get; } }}As you can see, we declared an interface for communication with one parameter. You can extend it and add your own parameters.
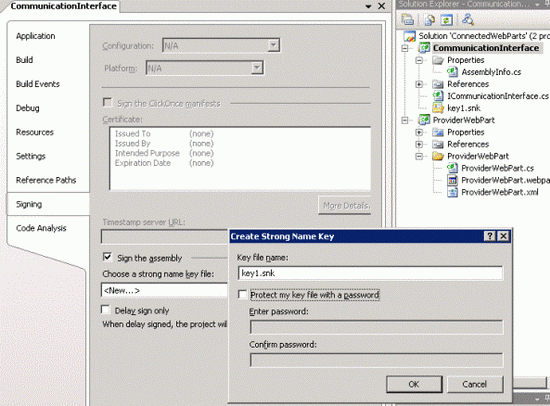
7. Right click on CommunicationInterface and choose properties; in the Signing tab, check "Sign the Assembly", and then in the dropdown list, select <New...> and name the file key1.snk and uncheck Protect key file with password.
8. Right click and Build the CommunicationInterface project.
9. In the ProviderWebPart project, right click and Add reference, and then choose the Projects tab and the CommunicationInterface project.
10. Double-click on ProviderWebPart.cs. Now, we must implement the interface in our Web Part class, so add this code to the class:
Use CommunicationInterface;and change the class declaration to:
public class ProviderWebPart : System.Web.UI.WebControls.WebParts.WebPart, ICommunicationInterface11. Implement the
Parameter1 property in the Web Part class using the following code:// implement the Parameter1 property from interfaceprotected string _parameter1 = "";public string Parameter1{ get { return _parameter1; }}12. Create the property that returns the interface and decorate it with the
ConnectionProvider attribute. The parameters of ConnectionProvider are the display name and the real name (ID) of the connection. When we declare more than one connection provider and consumer (like SharePoint Web Parts), we must choose a unique name for IDs of connections in a Web Part.// create a property that return the interface reference// and decorate it with ConnectionProvider[ConnectionProvider("Parameter1 Provider", "Parameter1 Provider")]public ICommunicationInterface ConnectionInterface(){ return this;}13. Add the following code to the
btn_click event:// set connection provider property with required textbox info.this.localParameter1 = txt.Text;Now, the whole code of
ProviderWebPart must be like this:public class ProviderWebPart : System.Web.UI.WebControls.WebParts.WebPart, ICommunicationInterface{ TextBox txt; Button btn; // implement the Parameter1 property from interface protected string _parameter1 = ""; public string Parameter1 { get { return _parameter1; } } // create a property that return the interface reference // and decorate it with ConnectionProvider [ConnectionProvider("Parameter1 Provider", "Parameter1 Provider")] public ICommunicationInterface ConnectionInterface() { return this; } public ProviderWebPart() { this.Title = "Provider WebPart"; this.ExportMode = WebPartExportMode.All; } protected override void CreateChildControls() { base.CreateChildControls(); Table tbl; TableRow row; TableCell cell; // A table for layout tbl = new Table(); row = new TableRow(); cell = new TableCell(); // first row for title cell.ColumnSpan = 2; cell.VerticalAlign = VerticalAlign.Middle; cell.HorizontalAlign = HorizontalAlign.Center; Label lblTitle = new Label(); lblTitle.Text = "This WebPart will send a parameter to a consumer:"; cell.Controls.Add(lblTitle); row.Controls.Add(cell); tbl.Controls.Add(row); // second row of table for textbox and button row = new TableRow(); cell = new TableCell(); cell.VerticalAlign = VerticalAlign.Middle; cell.HorizontalAlign = HorizontalAlign.Center; txt = new TextBox(); txt.Text = ""; txt.Width = Unit.Pixel(120); ; cell.Controls.Add(txt); row.Controls.Add(cell); cell = new TableCell(); cell.VerticalAlign = VerticalAlign.Middle; cell.HorizontalAlign = HorizontalAlign.Center; btn = new Button(); btn.Text = "Send..."; btn.Click += new EventHandler(btn_Click); cell.Controls.Add(btn); row.Controls.Add(cell); tbl.Controls.Add(row); //add table to webpart this.Controls.Add(tbl); } void btn_Click(object sender, EventArgs e) { // set connection provider property with required textbox info. this._parameter1 = txt.Text; }}14. In the properties folder, double click on AssemblyInfo.cs and change:
[assembly: CLSCompliant(true)] to:
[assembly: CLSCompliant(false)]
15. For successful Web Part deployment, we need to add the CommunicationInterface DLL into the GAC. So, open Windows Explorer and browse: c:\windows\assembly. Then, open another explorer instance and browse: [your solution path]\ProviderWebPart\CommunicationInterface\bin\Debug. Now, drag and drop CommunicationInterface.dll in c:\windows\assembly.
16. Right click on the Web Part project and choose build and deploy.
Now, ProviderWebPart is ready to use in SharePoint and we must create a consumer Web Part.
Creating ConsumerWebPart in Visual Studio
1. In the File menu, add a new Web Part project to the solution and name it ConsumerWebPart.
2. Delete the WebPart1 folder in Solution Explorer.
3. Right click on the project and choose Add New Item, and then choose Web Part. Change the name of the Web Part to ConsumerWebPart.
4. In the ConsumerWebPart project, right click and Add reference to the CommunicationInterface project.
5. In the Properties folder, double click on AssemblyInfo.cs and change:
[assembly: CLSCompliant(true)]to:
[assembly: CLSCompliant(false)]6. Double click on ConsumerWebPart.cs and add following code above the class:
using CommunicationInterface;7. In the
ConsumerWebPart class, add the following code:public class ConsumerWebPart : System.Web.UI.WebControls.WebParts.WebPart{ Label lblTitle; Label lblResult; ///// the string info consumer from custom reciever // ICommunicationInterface connectionInterface = null; // The consumer webpart must define a method that // would accept the interface as an parameter // and must be decorated with ConnectionConsumer attribute [ConnectionConsumer("Parameter1 Consumer", "Parameter1 Consumer")] public void GetConnectionInterface(ICommunicationInterface _connectionInterface) { connectionInterface = _connectionInterface; } ///////////////////////////////////////////////////////// public ConsumerWebPart() { this.Title = "Consumer WebPart"; this.ExportMode = WebPartExportMode.All; } protected override void CreateChildControls() { base.CreateChildControls(); Table tbl; TableRow row; TableCell cell; // A table for layout tbl = new Table(); row = new TableRow(); cell = new TableCell(); // first row for title cell.VerticalAlign = VerticalAlign.Middle; cell.HorizontalAlign = HorizontalAlign.Center; lblTitle = new Label(); lblTitle.Text = "This WebPart will recieve " + "a parameter from a provider:"; cell.Controls.Add(lblTitle); row.Controls.Add(cell); tbl.Controls.Add(row); //second row for result row = new TableRow(); cell = new TableCell(); cell.VerticalAlign = VerticalAlign.Middle; cell.HorizontalAlign = HorizontalAlign.Center; lblResult = new Label(); //check the connectionInterface for recieving the parameter1 if (connectionInterface != null) { lblResult.Text = connectionInterface.Parameter1+ " is recieved!"; } else { lblResult.Text = "nothing is recieved!"; } cell.Controls.Add(lblResult); row.Controls.Add(cell); tbl.Controls.Add(row); //add table to webpart this.Controls.Add(tbl); }}8. Build and deploy the ConsumerWebPart project.
Using the Created Web Parts in SharePoint and Connecting Them
After creating and deploying our Web Parts, we can check the functionality in the SharePoint environment.
1. Broswe your SharePoint site and edit a Web Part page like default.aspx. Use Site Actions and Edit Page.
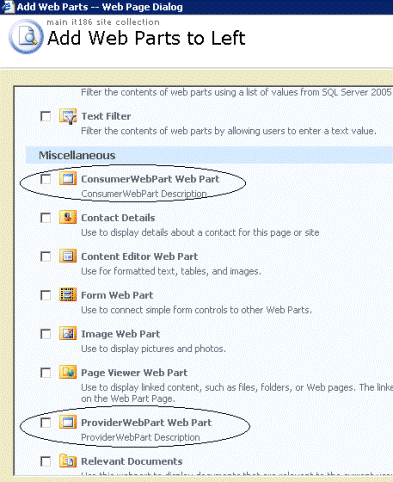
2. Click Add Web Part in a Web Part zone; your deployed Web Parts must be in Miscellaneous. Check both ProviderWebPart and ConsumerWebPart, and click Add.
3. Now, you can connect your Web Parts. Click on Edit in ConsumerWebPart, and in Connections; check Get Paramet1 consumer from ProviderWebPart.
4. Now, click on Exit edit mode on the top of the page.
5. Check the functionality of our Web Parts. Type a word and click the "Send..." button and check the ConsumerWebPart.

Article taken from
http://www.codeproject.com/KB/sharepoint/ConnectingCustomWebParts.aspx